Image Histogram 을 만들어보자
2018, Jun 26
이번 포스팅에서는 image를 이용하여 histogram을 그려볼 것이다. image histogram 이란 image 픽셀 값의 빈도를 막대 그래프로 나타낸 것이다.
방법은 단일 채널의 히스토그램을 그린 뒤 합쳐서 칼라이미지의 히스토그램을 그리는 것이다.
먼저 단일 채널의 히스토그램을 그려보자. 헤더 파일에 선언하는 것은 생략하기로 하고 정의 부분만 살펴보자.
ImageProc.cpp
void ImageProc::CreateHistogramSingleChannel(unsigned char* image_input,
	unsigned char* histo_output, const int width, const int height,
	const int histo_width, const int histo_height)
{
    // 빈도 값을 저장할 배열을 선언
    float valArr[256] = { 0.f };

    // 이미지 픽셀 값의 빈도를 늘리면서
    // 후에 정규화를 위해 max 값을 저장한다.
	float max = 0.f;
	for (int i = 0; i < width*height; i++)
	{
		valArr[image_input[i]] += 1.f;
		max = __max(valArr[image_input[i]], max);
	}

	// histogram image 에 빈도값을 그린다.
    // histogram value 는 255까지 이다.
	for (int i = 0; i < 256; i++)
	{
        // 구한 max 값을 이용해 정규화 한다.
        // histo_height는 해당 value 가 가질 수 있는 최대값이다.
		valArr[i] = (valArr[i] / max) * histo_height;
        // 빈도만큼 반복하면서 아래부터 색깔을 칠한다.
		for (int j = 0; j < valArr[i]; j++)
		{
            // histogram 너비는 512로 만들 예정이다.
            // 체크를 2px 에 걸쳐 해준다.
			histo_output[(histo_height - 1 - j)*histo_width + (i * 2) + 0] = 255;
			histo_output[(histo_height - 1 - j)*histo_width + (i * 2) + 1] = 255;
		}
	}
}
단일 히스토그램을 합쳐서 칼라 이미지의 히스토그램으로 만드는 함수를 정의하자. 칼라 이미지와 히스토그램 이미지를 단일 채널로 나눈뒤 작업하고 단일 칼라 이미지의 히스토그램을 하나로 합치면 된다.
ImageProc.cpp
void ImageProc::CreateHistogram(unsigned char* image_input,
	unsigned char* histo_output, const int width, const int height,
	const int histo_width, const int histo_height)
{
	unsigned char* img_R = new unsigned char[width*height];
	unsigned char* img_G = new unsigned char[width*height];
	unsigned char* img_B = new unsigned char[width*height];

	SplitChannels_ColorToRGB(img_R, img_G, img_B, image_input, width, height);

	unsigned char* histo_R = new unsigned char[histo_width*histo_height];
	unsigned char* histo_G = new unsigned char[histo_width*histo_height];
	unsigned char* histo_B = new unsigned char[histo_width*histo_height];

	SplitChannels_ColorToRGB(histo_R, histo_G, histo_B, histo_output, histo_width, histo_height);

	CreateHistogramSingleChannel(img_R, histo_R, width, height, histo_width, histo_height);
	CreateHistogramSingleChannel(img_G, histo_G, width, height, histo_width, histo_height);
	CreateHistogramSingleChannel(img_B, histo_B, width, height, histo_width, histo_height);

	MergeChannels_RGBToColor(histo_R, histo_G, histo_B, histo_output, histo_width, histo_height);

	delete[] img_R;
	delete[] img_G;
	delete[] img_B;
	delete[] histo_R;
	delete[] histo_G;
	delete[] histo_B;
}
이제 이벤트처리기를 달아보자.
ImageProcessingDoc.cpp
void CImageProcessingDoc::OnHistogramCreatehistogram()
{
	// TODO: 여기에 명령 처리기 코드를 추가합니다.
    // histogram 너비는 512, 높이는 이미지 사이즈와 같이 한다.
	const int histo_width = 512;
	const int histo_height = m_Images[cur_index].height;

    // histogram 을 4byte의 칼라이미지 버퍼로 만든다.
	histogram = new unsigned char[histo_width * histo_height * 4];
	memset(histogram, 0, sizeof(unsigned char)*histo_width*histo_height * 4);

    // 기능을 적용한다.
	ImageProc::CreateHistogram(m_Images[cur_index].image_color, histogram,
		m_Images[cur_index].width, m_Images[cur_index].height, histo_width, histo_height);

	CImageProcessingView* pView = (CImageProcessingView*)((CMainFrame*)(AfxGetApp()->m_pMainWnd))->GetActiveView();

    // 아래 함수는 새로 정의한다.
    // image + histogram 의 너비 만큼 그려주는 함수이다. 아래에서 정의하겠다.
	pView->SetDrawImageWithHistogram(m_Images[cur_index].image_color, histogram,
		m_Images[cur_index].width, m_Images[cur_index].height,histo_width, histo_height);

	pView->OnInitialUpdate();
}
historgram을 화면에 그려주는 함수를 짜보자. ImageProcessingView.cpp 에 정의하는 함수이다.
ImageProcessingView.cpp
void CImageProcessingView::SetDrawImageWithHistogram(unsigned char* image, unsigned char* histogram,
const int width, const int height, const int histo_width, const int histo_height)
{
// image 가 그려질 공간은 왼쪽 image width + 오른쪽 histogram width 이다.
m_ImgWidth = width + histo_width;
m_ImgHeight = height;
if (m_Image)
delete[] m_Image;
// 화면을 histogram 너비 만큼 써야 하기 때문에 +histo_width 를 해준다.
m_Image = new unsigned char[(width + histo_width) * height * 4];
// 왼쪽 이미지를 그린다.
for (int i = 0; i<width; i++)
{
for (int j = 0; j < height; j++)
{
m_Image[(m_ImgWidth*j + i) * 4 + 0] = image[(width*j + i) * 4 + 0];
m_Image[(m_ImgWidth*j + i) * 4 + 1] = image[(width*j + i) * 4 + 1];
m_Image[(m_ImgWidth*j + i) * 4 + 2] = image[(width*j + i) * 4 + 2];
}
}
// 오른쪽 히스토그램을 그린다.
for (int i = 0; i<histo_width; i++)
{
for (int j = 0; j < histo_height; j++)
{
m_Image[(m_ImgWidth*j + i + width) * 4 + 0] = histogram[(histo_width*j + i)*4 + 0];
m_Image[(m_ImgWidth*j + i + width) * 4 + 1] = histogram[(histo_width*j + i)*4 + 1];
m_Image[(m_ImgWidth*j + i + width) * 4 + 2] = histogram[(histo_width*j + i)*4 + 2];
}
}
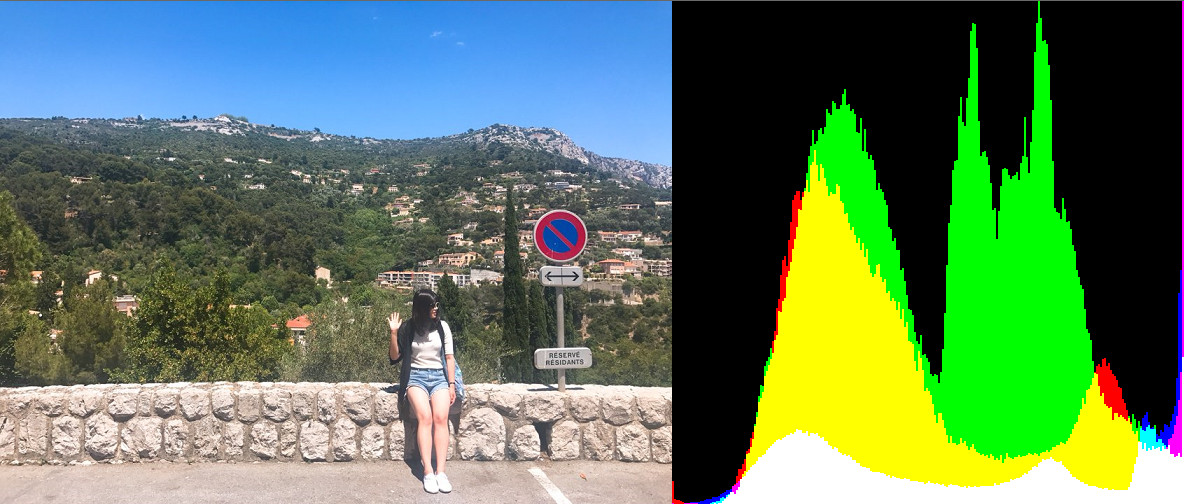
}실행하면 다음과 같이 이미지가 처리된다.