Y 뱡향, X 방향 MIP 를 만들어보자.
2018, Jul 16
이전 포스팅 에서는 Z 방향으로 MIP 를 만들어 보았는데, X 방향 Y 방향 또는 어떤 방향에서도 MIP 를 만들 수 있다.
작업을 수행하기 전에,
코드를 유연하게 만들기 위해 Volume 이미지로 하는 작업을 클래스로 만들어 캡슐화 해보자. 이전 구조는 Doc 에서 Volume class 를 부르는 구조 였는데 이제 Doc 에서는 Renderer 클래스를 호출하고 Rendere 클래스가 Volume 관련 작업을 하도록 바꿔보자.
VolumeRendererDoc.h
#pragma once
// #include "Volume.h"
#include "Renderer.h"
#include <memory>
using namespace std;

class CVolumeRendererDoc: public CDocument
{
private:
    //shared_ptr<Volume> m_pVolume;
    shared_ptr<Renderer> m_pRenderer;
}
VolumeRendererDoc.cpp
...
BOOL CVolumeRendererDoc::OnNewDocument()
{
    ...

    //m_pVolume = shared_ptr<Volume>(new Volume(temp_vol,width,height, depth));
    m_pRenderer = shared_ptr<Renderer>(new Renderer(temp_vol,width,height,depth));
    ...
}
이제 Rendere Class 를 만들자.
Renderer.h
#include "Volume.h"
#include <memory>
using namespace std;

class Renderer
{
private:
    shared_ptr<Volume> m_pVolume;
public:
    Renderer();
    Renderer(unsigned char* volume, int width, int height, int depth);
    ~Renderer();
}
Renderer.cpp
#include "stdafx.h"
#include "Renderer.h"

Renderer::Renderer()
{
    m_pVolume = nullptr;
}

Renderer::Renderer(unsigned char* volume,int width, int height, int depth)
{
    m_pVolume = shared_ptr<Volume>(new Volume(volume, width, height, depth));
}
Renderer 클래스를 거의 다 만들었다. 이제 기능만 추가해서 넣어주면 된다.
X, Y, Z 방향으로 잘라서 보여주는 기능을 만들어보자.
VolumeRendererDoc.cpp
void CVolumeRendererDoc::OnSlicerenderingXdirection()
{
    // 이미지 버퍼를 만들어 넣어주고
    // Renderer 클래스 함수에서 채워서 바깥으로 던지는 방식으로 만들 것이다.
    const int img_width = 256;
    const int img_height = 256;
    shared_ptr<unsigned char> image =
        shared_ptr<unsigned char>(new unsigned char[img_width*img_height]);

    // x 좌표를 넣어주어서 x 좌표 중 어느 부분을 보여줄지 정한다.
    m_pRenderer->RenderSliceXDirection(image.get(), img_width, img_height, 120);

    CVolumeRendererView* pView =
		(CVolumeRendererView*)((CMainFrame*)(AfxGetApp()->m_pMainWnd))->GetActiveView();

	pView->SetDrawImage(image.get(), img_width, img_height, 1);

	pView->OnInitialUpdate();
}
Renderer.cpp
bool Renderer::RenderSliceXDirection(unsigned char* image,
    const int img_width, const int img_height, const int depth)
{
    int vol_height = m_pVolume->GetHeight();
    int vol_depth = m_pVolume->GetDepth();

    for(int i=0; i<vol_height; i++)
    {
        for(int j=0; j<vol_depth; j++)
            image[j*img_width + i] = m_pVolume->GetVoxel(depth,i, j);
    }

    return true;
}
Y 방향 Z 방향은 위와 같으므로 알아서 만들어보자.
MIP 를 Y뱡향과 X 방향으로 만들어보자.
VolumeRendererDoc.cpp
void CVolumeRendererDoc::OnMiprenderingXdirection()
{
	// TODO: 여기에 명령 처리기 코드를 추가합니다.

	int img_width = 256;
	int img_height = 256;

	shared_ptr<unsigned char> image =
		shared_ptr<unsigned char>(new unsigned char[img_width*img_height]);
	memset(image.get(), 0, sizeof(unsigned char)*img_width*img_height);

	m_pRenderer->RenderMIPXDirection(image.get(), img_width, img_height);

	CVolumeRendererView* pView =
		(CVolumeRendererView*)((CMainFrame*)(AfxGetApp()->m_pMainWnd))->GetActiveView();

	pView->SetDrawImage(image.get(), img_width, img_height, 1);

	pView->OnInitialUpdate();
}
Renderer.cpp
bool Renderer::RenderMIPXDirection(unsigned char* image,
    const int width, const int height)
{
    int vol_width = m_pVolume->GetWidth();
    int vol_height = m_pVolume->GetHeight();
    int vol_depth = m_pVolume->GetDepth();

    for(int j = 0; j< vol_depth; j++)
    {
        for(int i=0; i< vol_height; i++)
        {
            unsigned char max_value = 0;
            for(int k=0; k< vol_width; k++)
            {
                max = __max(max_value, m_pVolume->GetVoxel(k,i,j));
            }
            image[width*j + i] = max;
        }
    }
}
같은 방식으로 Y 방향기능만 구현해보면 아래와 같다.
Renderer.cpp
bool Renderer::RenderMIPYDirection(unsigned char* image,
const int width, const int height)
{
int vol_width = m_pVolume->GetWidth();
int vol_height = m_pVolume->GetHeight();
int vol_depth = m_pVolume->GetDepth();
for(int j = 0; j< vol_depth; j++)
{
for(int i=0; i< vol_width; i++)
{
unsigned char max_value = 0;
for(int k=0; k< vol_height; k++)
{
max = __max(max_value, m_pVolume->GetVoxel(i,k,j));
}
image[width*j + i] = max;
}
}
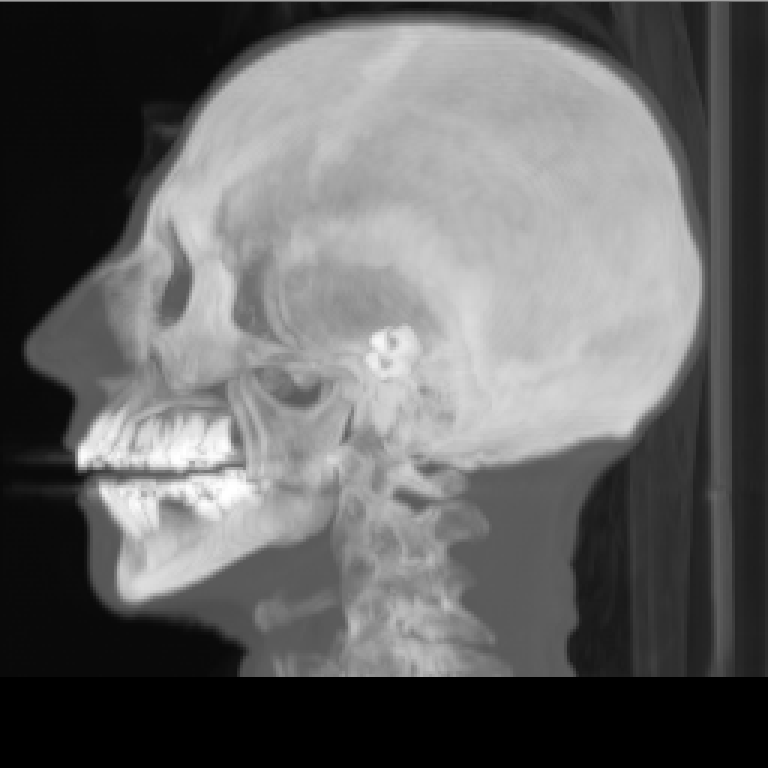
}MIP X-direction 은 아래와 같고
MIP Y-direction 은 아래와 같다.
