3차원 이미지를 처리해보자.
2018, Jul 12
지금까지 포스팅은 2차원 이미지를 다뤘다. 이미지 구조가 3차원인 데이터를 처리하는 방법을 알아보자. 먼저 mfc 프로젝트를 생성한다. 나같은 경우 VolumeRenderer 이름으로 생성했다. 이미지가 z-index 를 가지는 Volume 형태이기 때문이다.
프로젝트가 실행되면 미리 준비한 3차원 데이터 “data\Bighead.den” 을 불러오도록 한다.
VolumeRendererDoc.cpp
Bool CVolumeRendererDoc::OnNewDocument()
{
if (!CDocument::OnNewDocument())
		return FALSE;

	// TODO: 여기에 재초기화 코드를 추가합니다.
	// SDI 문서는 이 문서를 다시 사용합니다.
	// 새 창이 뜨면 data를 불러와 버퍼에 저장한다.
	FILE* fp;
	fopen_s(&fp, "data//Bighead.den", "rb");

	// volume 사이즈를 미리 계산해 둔 것이다.
	int width = 256;
	int height = 256;
	int depth = 256;
	unsigned char* temp_vol = new unsigned char[width*height*depth];
	fread(temp_vol, 1, sizeof(unsigned char)*width*height*depth, fp);

	// 클래스 변수에 볼륨을 저장하고 pointer 변수가 이를 가리키게 한다.
	m_pVolume = shared_ptr<Volume>(new Volume(temp_vol,width,height,depth));

	fclose(fp);

	delete[] temp_vol;

	printf("volume load complete\n");
	return TRUE;
}
위 코드에서 사용한 클래스 변수를 정의하고 선언하자
Volume.h
#pragma once
// shared_ptr 사용하려면 추가
#include <memory>
using namespace std;

class Volume
{
private:
    shared_ptr<unsigned char> m_volume;
    int m_width;
    int m_height;
    int m_depth;
public:
    Volume();
    // volume 을 받으면 메모리 생성하고 volume 의 내용을 카피한다.
    Volume(unsigned char* volume, int width, int height, int depth);
    ~Volume();

public:
    // 인자 좌표에 해당하는 voxel 을 반환한다.
	unsigned char getVoxel(int x, int y, int z);
	int getWidth();
	int getHeight();
	int getDepth();
};
Volume.cpp
#include "stdafx.h"
#include "Volume.h"

Volume::Volume()
{
	m_volume = nullptr;
}

Volume::Volume(unsigned char* volume, int width, int height, int depth)
{
	m_volume = shared_ptr<unsigned char>(
		new unsigned char[width*height*depth]);
	// m_volume.get() 하면 shared_ptr이 가리키는 배열의 주소가 반환된다.
	memcpy(m_volume.get(), volume, sizeof(unsigned char)*width*height*depth);
	m_width = width;
	m_height = height;
	m_depth = depth;
}


Volume::~Volume()
{
}

unsigned char Volume::getVoxel(int x, int y, int z)
{
	// return m_volume[z][y][x]
	return m_volume.get()[m_width*m_height*z + m_width * y + x];
}

int Volume::getWidth()
{
	return m_width;
}

int Volume::getHeight()
{
	return m_height;
}

int Volume::getDepth()
{
	return m_depth;
}
이제 VolumeRendererDoc.cpp 에서 Volume 클래스를 사용할 수 있도록 선언해주자.
VolumeRendererDoc.h
//shared_ptr 사용하려면 아래와 같이 선언
#include <memory>
// Volume 클래스를 사용하기 위해 선언
#include "Volume.h"

using namespace std;

class CVolumeRendererDoc : public CDocument
{
    ...
    private:
	//shared_ptr을 이용하여 Volume 클래스 포인터를 선언한다.
	shared_ptr<Volume> m_pVolume;
    ...
}
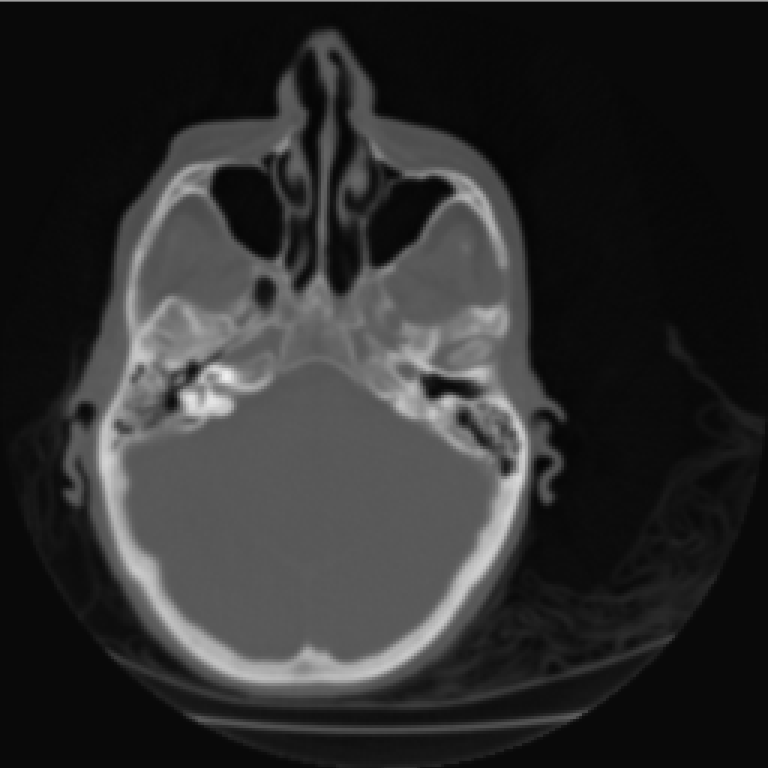
3 차원 이미지를 Z-index 방향으로 자른 단면을 보여주는 기능을 만들어보자
VolumeRendererDoc.cpp
// volume 을 z 방향으로 자른 단면을 보여주는 기능
void CVolumeRendererDoc::OnSlicerenderingZdirection()
{
	// TODO: 여기에 명령 처리기 코드를 추가합니다.
	// 단면의 화면 버퍼를 만든다.
	int img_width = m_pVolume->getWidth();
	int img_height = m_pVolume->getHeight();
	shared_ptr<unsigned char> image =
		shared_ptr<unsigned char>(new unsigned char[img_width*img_height]);

	// 버퍼에 단면정보를 저장한다.
	for (int j = 0; j < img_height; j++)
	{
		for (int i = 0; i < img_width; i++)
		{
			// z-index 120 인 화면의 단면 정보를 저장한다.
			image.get()[img_width*j + i] = m_pVolume->getVoxel(i, j, 120);
		}
	}

	CVolumeRendererView* pView =
		(CVolumeRendererView*)((CMainFrame*)(AfxGetApp()->m_pMainWnd))->GetActiveView();

	pView->SetDrawImage(image.get(), img_width, img_height, 1);

	pView->OnInitialUpdate();
}
위에서 쓰인 함수 SetDrawImage 와 화면 그릴때 쓰는 함수인 OnDraw 함수를 정의해준다.
VolumeRendererView.cpp
...
CVolumeRendererView::CVolumeRendererView()
{
	// TODO: 여기에 생성 코드를 추가합니다.
	// 화면 사이즈와 그려야 할 데이터를 정의한다.
	m_Image = nullptr;
	m_ImgWidth = 768;
	m_ImgHeight = 768;
	m_Image =
		shared_ptr<unsigned char>(new unsigned char[m_ImgWidth*m_ImgHeight*4]);
	memset(m_Image.get(), 0, sizeof(unsigned char)*m_ImgWidth*m_ImgHeight * 4);
}
...
// 인자로 받은 image를 화면 사이즈에 맞춰 그린다.
void CVolumeRendererView::SetDrawImage(unsigned char* image,
	const int width, const int height, const int byte)
{
	// 화면에 대한 이미지의 비율을 구한다.
	float rate[2] = { 0.f };
	rate[0] = static_cast<float>(width) / static_cast<float>(m_ImgWidth);
	rate[1] = static_cast<float>(height) / static_cast<float>(m_ImgHeight);

	if (byte == 1)
	{
		for (int j = 0; j < m_ImgHeight; j++)
		{
			for (int i = 0; i < m_ImgWidth; i++)
			{
				int mode[2] = { 0 };
				mode[0] = rate[0] * i; mode[1] = rate[1] * j;
				if (mode[0] >= width || mode[1] >= height) continue;

				m_Image.get()[(m_ImgWidth*j + i) * 4 + 0] = image[width*mode[1] + mode[0]];
				m_Image.get()[(m_ImgWidth*j + i) * 4 + 1] = image[width*mode[1] + mode[0]];
				m_Image.get()[(m_ImgWidth*j + i) * 4 + 2] = image[width*mode[1] + mode[0]];
			}
		}
	}
	else
	{
		for (int j = 0; j < m_ImgHeight; j++)
		{
			for (int i = 0; i < m_ImgWidth; i++)
			{
				int mode[2] = { 0 };
				mode[0] = rate[0] * i; mode[1] = rate[1] * j;
				if (mode[0] >= width || mode[1] >= height) continue;

				m_Image.get()[(m_ImgWidth*j + i) * 4 + 0] = image[(width*mode[1] + mode[0])*byte + 0];
				m_Image.get()[(m_ImgWidth*j + i) * 4 + 1] = image[(width*mode[1] + mode[0])*byte + 1];
				m_Image.get()[(m_ImgWidth*j + i) * 4 + 2] = image[(width*mode[1] + mode[0])*byte + 2];
			}
		}
	}
}
...

void CVolumeRendererView::OnDraw(CDC* pDC)
{
	CVolumeRendererDoc* pDoc = GetDocument();
	ASSERT_VALID(pDoc);
	if (!pDoc)
		return;

	// TODO: 여기에 원시 데이터에 대한 그리기 코드를 추가합니다.
	if (m_Image)
	{
		CDC MemDC;
		BITMAP bmpInfo;

		// 화면 DC와 호환되는 메모리 DC를 생성
		MemDC.CreateCompatibleDC(pDC);

		// 비트맵 리소스 로딩
		CBitmap cBitmap;
		cBitmap.CreateBitmap(m_ImgWidth, m_ImgHeight, 1, 32, m_Image.get());
		CBitmap* pOldBmp = NULL;

		// 로딩된 비트맵 정보 확인
		cBitmap.GetBitmap(&bmpInfo);

		//printf("view image width %d, height %d\n", bmpInfo.bmWidth, bmpInfo.bmHeight);

		// 메모리 DC에 선택
		pOldBmp = MemDC.SelectObject(&cBitmap);

		// 메모리 DC에 들어 있는 비트맵을 화면 DC로 복사하여 출력
		pDC->BitBlt(0, 0, bmpInfo.bmWidth, bmpInfo.bmHeight, &MemDC, 0, 0, SRCCOPY);
	}
}
기능을 실행하면 아래 그림과 같이 보인다.

X-index 방향, Y-index 방향으로 자른 단면도 화면에 출력할 수 있다.